Welcome. My name is Stavros. After many years of desktop programming, I recently decided to give web development a try. These are the results of my journey so far...
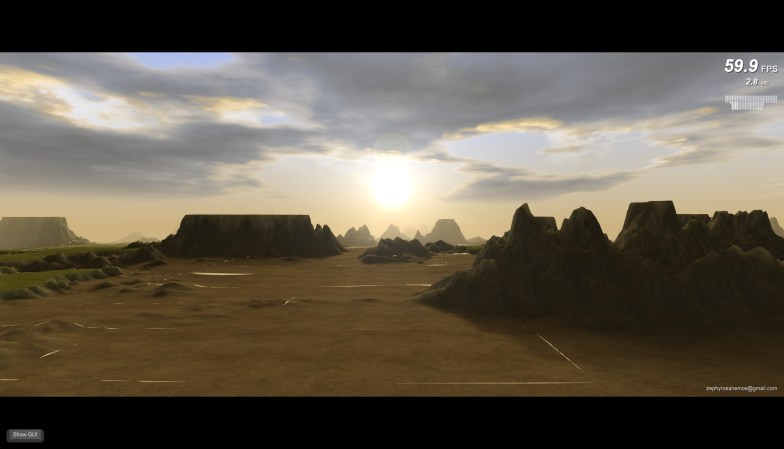
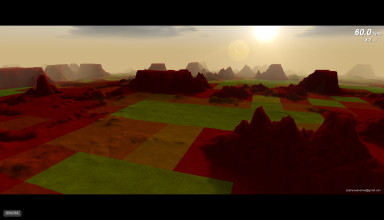
Project Windstorm - The demo
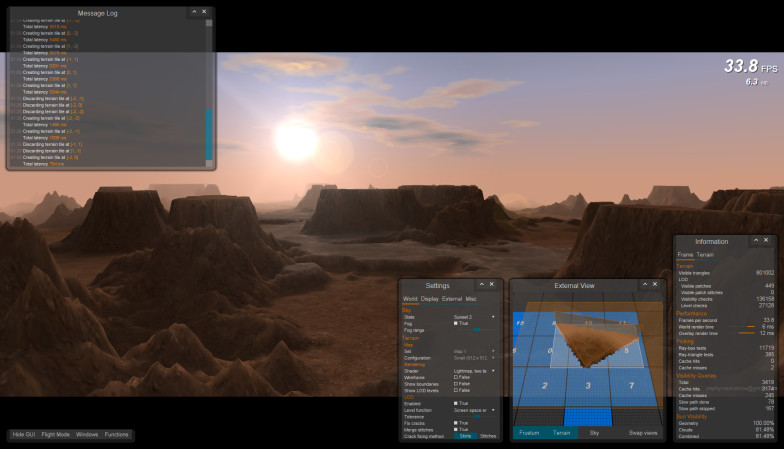
When I tried to think of a project suitable for learning JavaScript, a terrain flyover demo came to mind. I've worked with terrain rendering in OpenGL before and using WebGL inside a Canvas element kept me pretty close to my comfort zone. Somehow, I quickly found myself also building a WebGL GUI to act as a debugging aid at first, a way to demonstrate and monitor the behavior of the terrain algorithms later (yes, my knowledge of the DOM was exactly zero at the time). So, without further ado:


Note: A WebGL-capable browser is required to run this demo.
A few notes on running the demo:
- The terrain is procedural, generated offline by a Delphi program (Delphi is a modern version of Pascal). The current demo uses a 2 x 2 tile set, which is infinitely repeated. This is due to the limitations of the terrain generator, not the engine. The engine itself has been made oblivious to this repetition for illustration purposes (a timestamp is appended to every request for each tile in order to bypass the browser's cache).
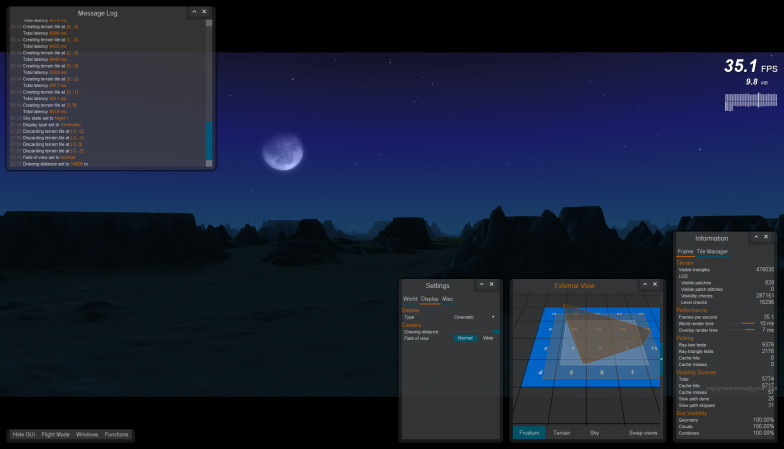
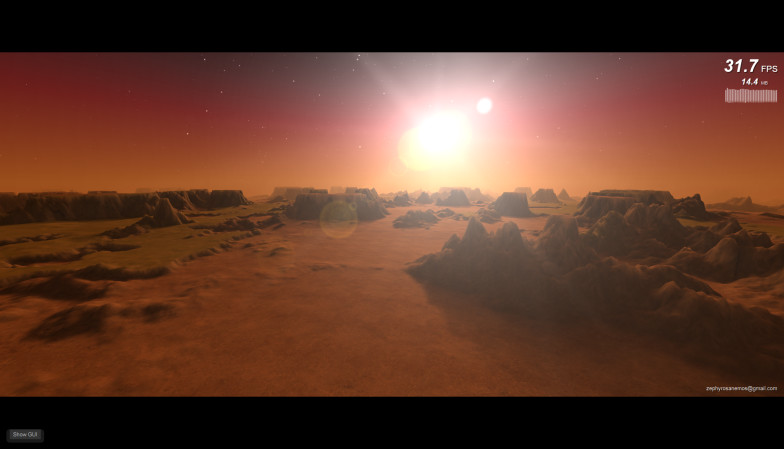
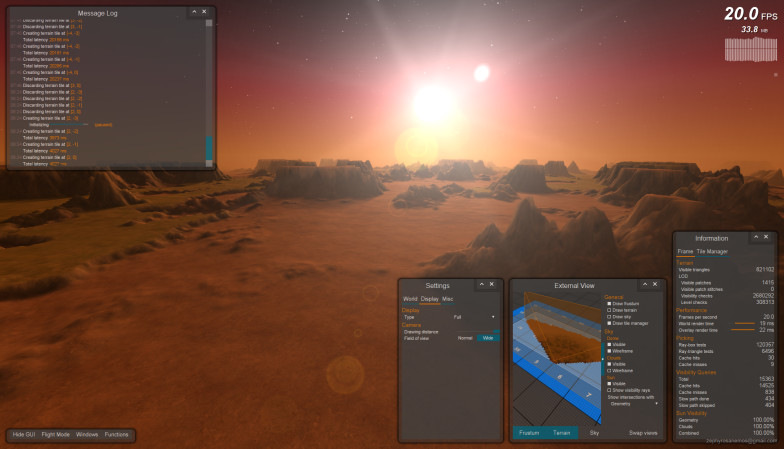
- The sky is composed of several components, most notable of which are the procedural cloud layers. The demo will pause briefly each time you change the sky state, mainly due to the computationally intensive task of generating the new clouds.
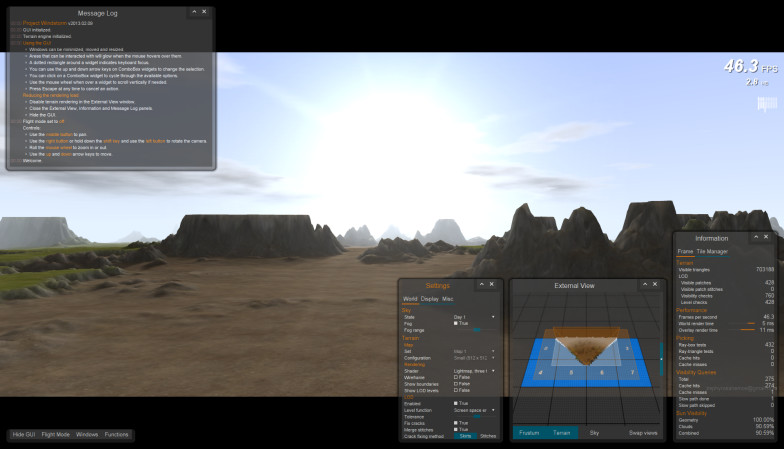
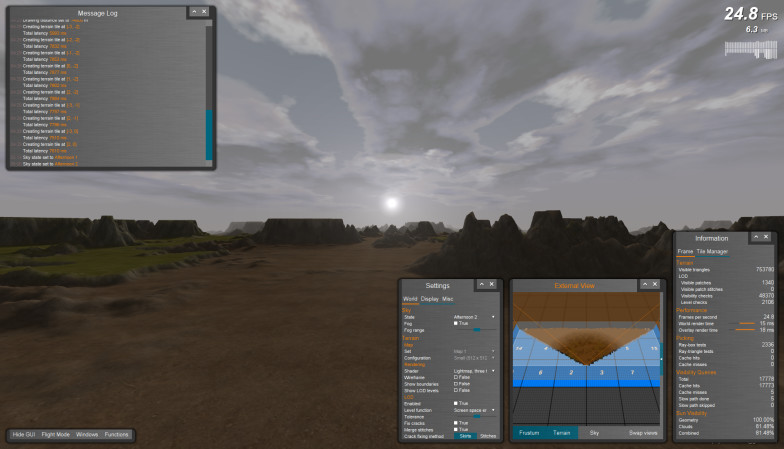
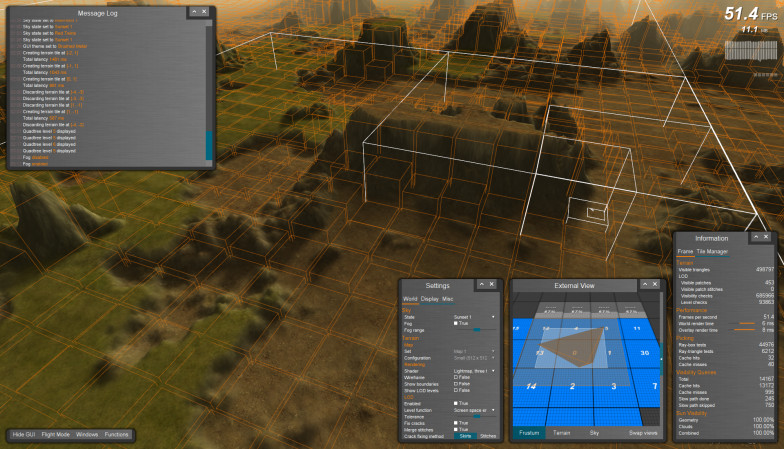
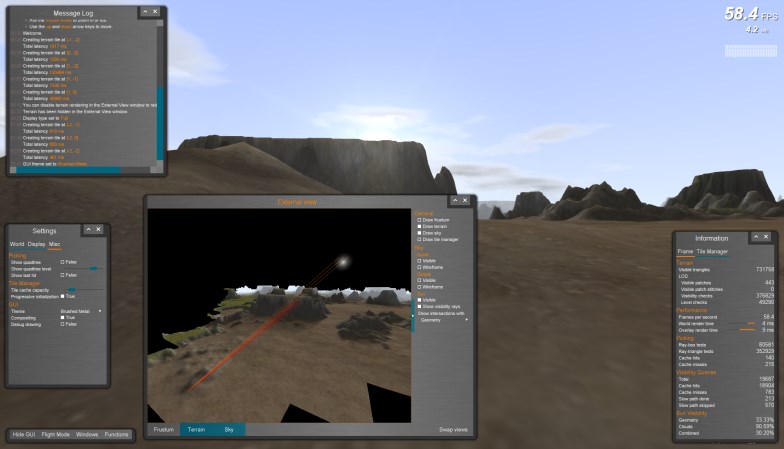
- GUI windows can be minimized, closed, moved and resized. Use this to arrange the GUI to your liking and adjust your viewing area.
- The Settings window is the one you will probably interact more with, with External View a close second.
- You can pan and rotate the camera in the External View window as well.
- A dotted rectangle around a widget indicates keyboard focus. If the main screen has lost focus to one of the GUI's widgets, you can click on it to get it back.
- To increase the frame rate, try turning off terrain rendering in the External View window. If the FPS count is too low, this will be automatically done after a while (once only).
- You can hide and restore the entire GUI at any time by clicking the button at the bottom right of the browser's window. This is probably the most effective thing you can do to speed things up.
- If something is flashing, it probably wants you to click on it.
So, what's so interesting about this?
This demo actually consists of two parts: the terrain engine and a WebGL GUI. They evolved in parallel, always vying for processor cycles and programmer attention. You can click on the blue button and play with it right now, or you can read the rest of this document for a discussion of a few of the things I found noteworthy during making it.
Some take-home points:
- Even though this is a terrain flyover demo, the GUI is responsible for the majority of rendering time.
- Calculating sun visibility the geometric way (by casting rays through the terrain and the clouds) can be expensive if not done carefully.
- Achieving an acceptable frame rate requires extensive use of computation caching. Everything must be done only once, only when necessary. Sometimes not even then.
- The specific LOD scheme used (Geomipmapping) will not make a positive difference on a desktop machine with a fast graphics card. What's more, it took quite a bit of optimizing to get this kind of great results! However, the LOD will speed things up just a bit on a laptop equipped with an average mobile 3D card.
- Fetching tiles in the background takes some careful planning (and the ability to cancel previous requests) in order to stay relevant when travelling at high speed.
- The main hurdle turned out not to be downloading tiles on time, but making them available to the renderer without causing large, visually distracting pauses.
- Since rendering the GUI is not performed independently of all other rendering tasks, user experience is significantly degraded as the application's frame rate drops. Acceptable usability requires a high frame rate (larger than, say, 30 FPS). Visually appealing results require an even higher FPS count.
A more detailed discussion of a few of the above points can be found below. All in all, both the GUI and the terrain engine serve more as educational playthings than anything else. Making them has certainly been a lot of fun and a very good way to get the hang of web development!
Since you've read this far, here are a few more notes on running the demo:
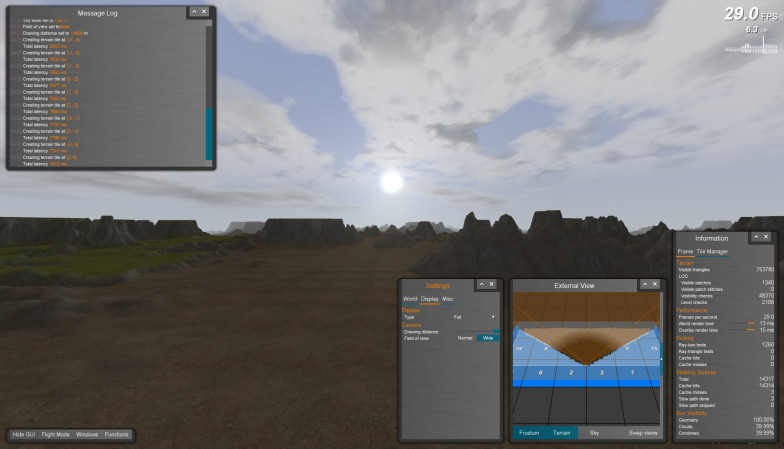
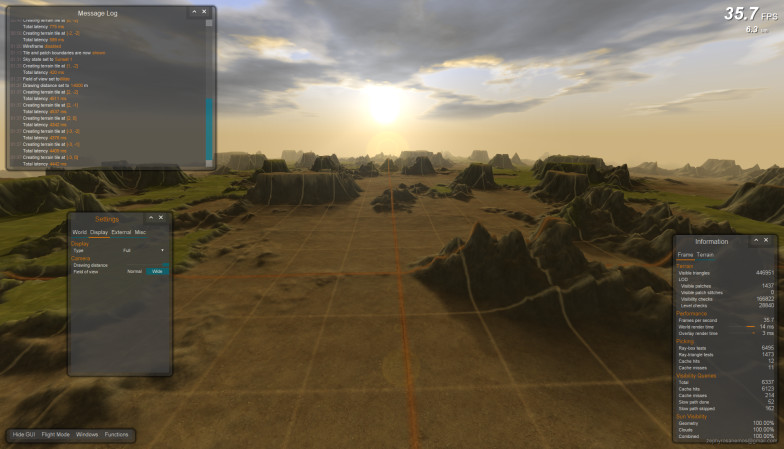
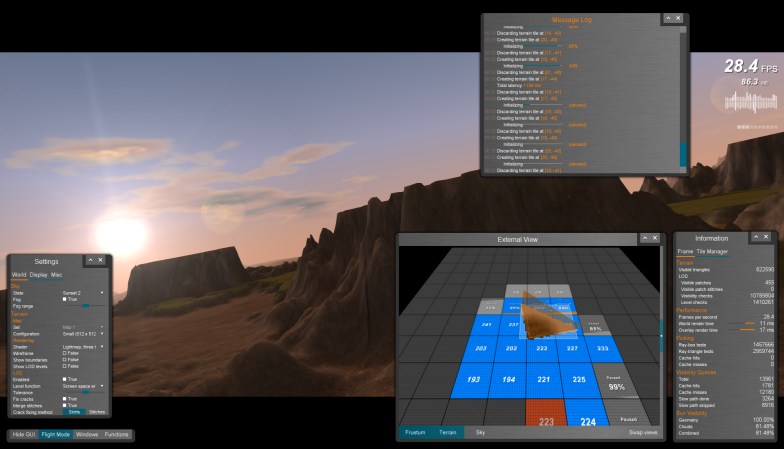
- After playing with the various settings for a while, you can check out the flight mode. While in this mode, use the left and right arrow keys to navigate. Press and hold the down arrow key to accelerate. You can watch the activity of the tile manager in the Message Log and (especially) the External View windows.
- Changing the field of view from 'Normal' to 'Wide' and increasing the drawing distance will probably have the greatest effect on the frame rate on the part of the terrain engine. This is more due to the greatly increased number of visible patches (and the associated processing that goes with it), rather than the raw triangle count. Flying over the terrain with these settings will also serve to stress the tile prefetcher.
- You can swap the World and External views. While in this state, resizing the External View window provides an easy way to observe how the frustum changes.
- If the transparency of the default GUI theme (Glass) is annoying, you can change it to Brushed Metal.
Project Windstorm - A brief discussion
Table of Contents
1. The WebGL GUI
At some point, I needed a way to view and modify variables in real time. The JavaScript console is very useful, but it can only go so far. Plus, designing and implementing a GUI can be really rewarding in its own right. It all started with a scrolling list of strings and an input prompt and it kinda grew from there...
1.1 Description
- Built around the concept of nested layouts.
- Loosely based on Android, both in appearance and layout specification.
- Basic entities are widgets, layouts and windows.
- Widgets that have been implemented so far: Button, Canvas, CheckButton, ComboBox, Drawable, Label, ListBox, Menu, MenuBar, RadioButton, TabHost, TextEdit, TextView, ToggleButton and TrackBar.
- Widgets and layouts can be scrollable.
- Fully compositing window manager.
- Sub-pixel text rendering.
- Uniformly responsive (i.e. almost anything that can be interacted with will glow when under the mouse)
- Efficient layout and rendering engine, able to present a substantial amount of text and graphics on screen.
- Uses XML files for specifying window layout.
- Rudimentary support for keyboard navigation.
- Easily extensible. New widgets can be created by supplying a .js and (optionally) an XML file.
Building the layout engine and figuring out ways to implement the various widgets has been very interesting. In the end though, the greatest challenge was to make it fast enough to be practical (i.e. being able to draw, handle and update multiple windows while still leaving enough processing time for the underlying application). In its early stages, adding a few simple widgets to a layout (e.g. some Labels) was enough to cause a small but significant drop in frame rate.
The GUI has always been responsible for the lion's share in rendering load, taking as much as 80% of a frame's rendering time at some point. Note that this was with much less information on screen. There were many reasons for this:
- Drawing text can be very slow if implemented the naive way. In fact, this was the main culprit in early versions.
- The graphics library must make sure that a widget cannot overwrite adjacent screen real estate, thus making a call to WebGL's Scissor function necessary every time a widget draws itself. This wouldn't have been so bad if it didn't preclude batching some of the drawing operations.
- Many functions, such as the one that converts coordinates from client (window) space to screen space (where the actual drawing takes place) get called all the time. In any system that has the form of a tree (such as the nested layout scheme), it is very natural to use a recursive implementation. However, this is highly inefficient.
- Another operation that the renderer relies heavily on, is a drawFilledRectangle function. Optimizing it (by using a matrix uniform to simply transform the values of a generic vertex buffer) also led to very significant speed gains.
The load is rather more balanced in the current version (both the GUI and the terrain engine have been heavily optimized since their early days). If the External View window does not have to render a second view of the terrain, rendering time is split a bit more evenly (although the GUI still takes the majority of rendering time). In this demo, rendering load can be seen in the Information window, as well as on the top right corner of the screen.
Caching is already used in a limited (but very important) form by the text drawing functions. Extending the caching concept to a fully-fledged dirty rectangle system would be the next logical step to take in order to accelerate the GUI even further.
1.2 Final thoughts
Just like the terrain engine, the GUI is by no means production-ready or fit for any particular purpose. Nevertheless, it's quite solid and reasonably efficient. Inserting and moving around widgets can be cumbersome, due to the lack of a visual designer and the need to work directly with XML files. However, everything behaves as expected (more or less) and constructing a moderately complex UI for an application is certainly doable. The main disadvantage at this point is that since rendering the GUI is closely coupled to rendering the rest of the application, an overall high FPS count is required to achieve a smooth, flowing interaction.
All in all, the GUI weighs in at ~12KLOC and spans 24 files, which is quite a bit more than the terrain engine itself!
2. The terrain engine
2.1 What does a terrain engine do?
The main goal of a terrain engine is three-fold:
- Present the engine user with a theoretically infinite terrain, seamlessly downloading and preparing data upon or ahead of demand with the minimum frame rate disruption.
- Determine and render the visible subset as quickly as possible, at an acceptable quality.
- Being able to respond to geometric intersection queries, again as quickly as possible.
All three of these sub-goals can present several challenges, each one of which can make for an interesting topic for a future blog post. The first one however, is the most interesting of all.
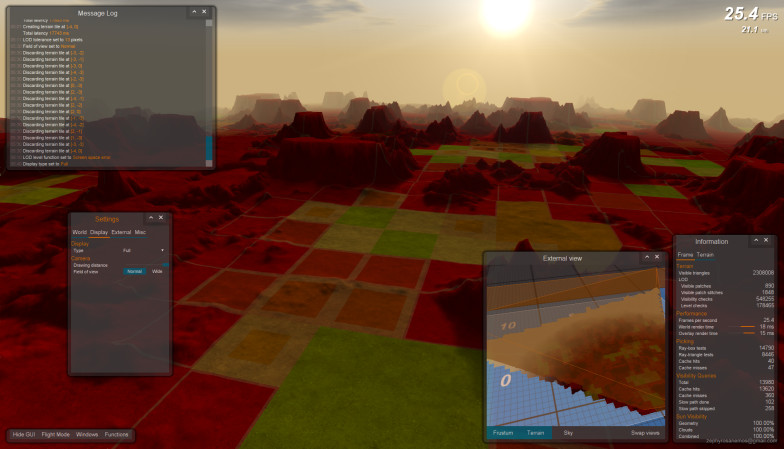
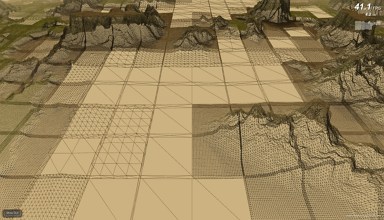
Terrain is stored as tiles on a remote server and downloaded on demand. A tile is the basic unit that the tile manager operates on and works with. The tile manager is responsible for deciding which tiles are relevant, issuing transfer requests to the server, creating suitable local structures from received raw data, answering to elevation and geometric intersection queries over the entire range of the terrain and finally keeping a local cache of tile objects. Essentially, it is the part that presents the rest of the engine with the illusion of an infinite, locally available terrain.
A tile is further subdivided into patches. A patch is the basic object used by the rendering part of the engine. For more on patches, see the Using a LOD scheme section.


So, how does the tile manager go about making the relevant part of the terrain locally available?
2.2. Fetching tiles
In this demo, there are two modes of operation: a static CAD-like mode (or a '3D strategy game' mode, if you're more of a gamer type) and a much more demanding 'flight' mode. The static mode is easy: a request is made to the tile manager for all the tiles currently intersecting the viewing frustum. Placeholder (i.e. empty but otherwise valid in every respect) tiles are immediately created while the necessary XMLHttpRequests are issued to the remote server. The placeholder tiles will be updated with the real data as soon as each transfer completes.
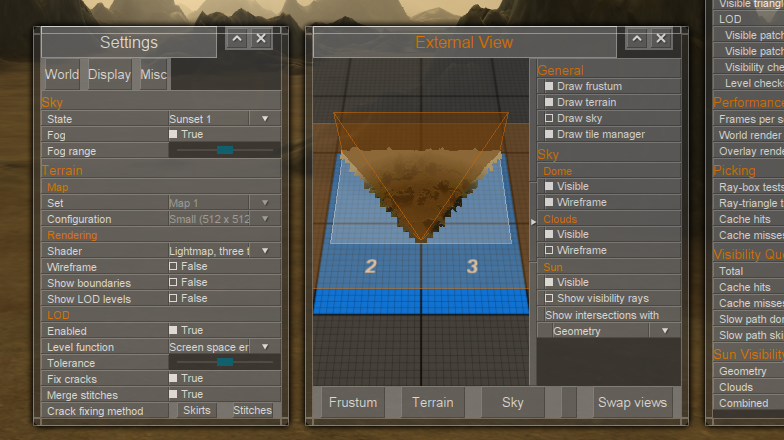
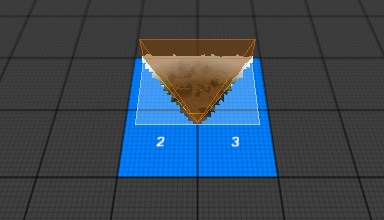
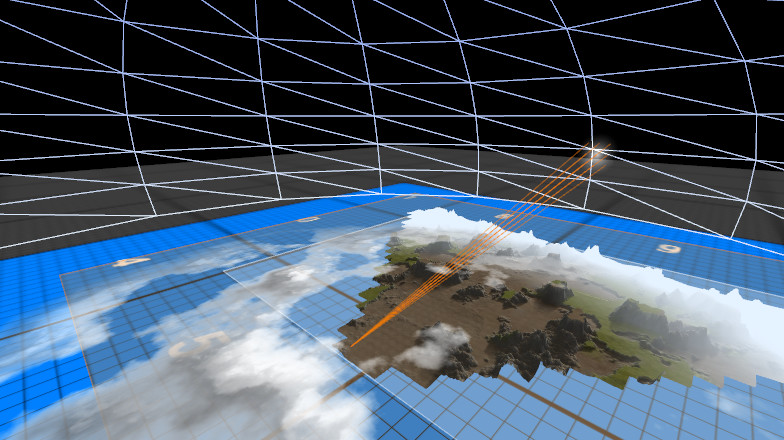
A very simple and efficient way to determine the potentially visible tiles is by performing a simple intersection test against the bounding box of the viewing frustum's projection on the Y = 0 (horizontal) plane (see first image below).
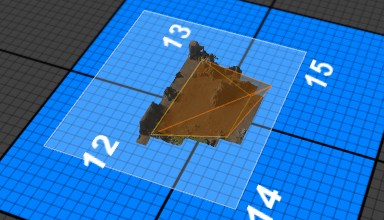
A slightly more involved but potentially better way (as long as the viewpoint remains above and relatively close to the ground) is to construct our bounding box from the points of the polygon that results from intersecting the frustum with the horizontal plane, combined with the projected points of the frustum's near plane (got that?). For situations where the camera is looking down the terrain at a certain angle, this will produce better bounds and can significantly reduce the number of culling operations that need to be done (albeit at the cost of clipping the horizontal plane against the six frustum planes). More importantly, it can prevent a few unnecessary tile requests at certain circumstances.

Frustum culling can be done on the patch level, using either bounding spheres or bounding boxes. Spheres are a definite win over boxes in this case, since the time taken to render the very few false positives is greatly offset by the much simpler test condition. Remember that modern JavaScript can be very fast, but the 3D graphics card is still way faster.
This is basically it for our current frustum position and orientation. We can run the above test just after the world camera has been initialized (but while the demo is still loading) and preload all the required tiles. In fact, this is what actually happens (you will notice that all visible tiles are already present when the demo starts). Now, since the fastest the frustum can change position or orientation is by using the mouse to pan or rotate the camera respectively (i.e. not very fast), a small border around the bounding box may be quite sufficient for our prefetching needs. Well, at least for the CAD-like mode.
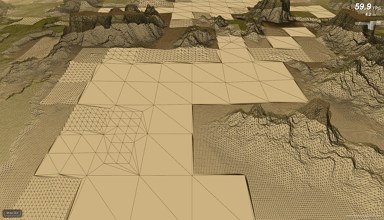
2.3 Prefetching tiles
Things really do change in flight mode. Since this is a flyover demo, there is the requirement of fast movement over large distances. In this case, we cannot afford to simply 'use a large enough border' or equivalently download all tiles within a certain radius around the view position. This might have been appropriate for a scenario in which the viewpoint moves slowly (e.g. a human character walking or running over the terrain), but not for a flying ship for example. The larger the speed of travel, the larger the radius would have to be and, assuming memory is limited and some type of caching is used (i.e. tiles can be discarded), it would very quickly result in a lot of wasted bandwidth. A more targeted approach is called for.
2.3.1 How do we decide which tiles to ask the server for?
A reasonable thing to do once we have a velocity vector would be to issue prefetching requests for all tiles intersecting a circular sector ahead of the frustum. The sector can be defined by a user-specified horizontal angle (which can be a percentage of our field of view and essentially represents our ability to cater for direction changes) and a length (which can be proportional to our travelling speed).
A very significant point: the ability to cancel XMLHttpRequests is essential. This became evident in practice. Ideally, no requests will be made for tiles that won't eventually be seen. However, as we are travelling in a variable (unknown) path and prefetching commands are issued to the tile manager, it is inevitable that some of the tiles are going to be bypassed or quickly become less relevant by a sudden change of direction. Since browsers (or servers) throttle XMLHttpRequests, some of them may have not even started. If those requests are not cancelled, they will delay later, more urgent requests from the prefetcher, possibly of tiles that are directly in front of -or even inside- the frustum. In fact, before the ability to cancel requests was implemented, this was a very typical scenario.
2.3.2 The fetching algorithm so far
The complete fetching algorithm (excluding tile initialization which will be explained in the next section) is described below.
- Current frustum parameters are computed.
- A request is sent for each missing tile intersecting our viewing frustum.
- The prefetching area is computed and a request is sent for each missing tile intersecting it.
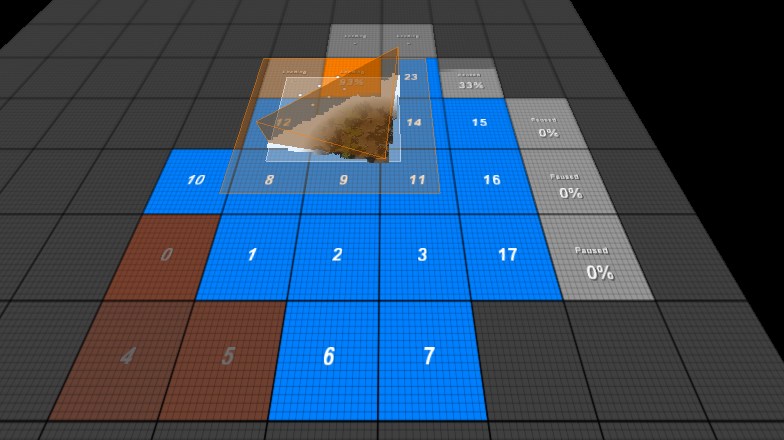
- Any running requests outside a second, larger circular sector are aborted and the respective placeholder tiles are discarded.
- Finally, any tiles in excess of the tile manager's cache capacity that lie outside a 'retaining zone' around the frustum (acting as a safeguard measure) are discarded in LRU (least recently used) order.
2.4 Initializing tiles
Making sure that tiles are locally present when needed is not the only problem, or even the most interesting one. It turns out that tile initialization takes a non-trivial amount of time, in the order of a few hundred milliseconds on a modern desktop machine. That's an appreciable fraction of a whole second and enough to cause very noticeable and distracting stuttering as newly arrived tiles are being initialized.
2.4.1 What is tile initialization?
Initialization in this case simply means doing anything that needs to be done for binary data or images that have just been received to be turned into renderable objects stored in graphics card memory. It can certainly include more than that (for example generating instead of transmitting the quadtree that is used for intersection queries or even dynamically creating the tile's lightmap based on the sun's current position), but let's stick to the most basic requirements.
Well, why does initialization take so long? In short, data decompression takes time (we are sending compressed data, since preserving bandwidth is important). On-the-fly quadtree generation (or even deserialization - lifting the tree from a binary blob) takes time as well. Even creating the WebGL textures and vertex buffers and uploading them to graphics card memory takes some time. In the end, it all adds up.
2.4.2 Why is this a problem?
Even with reasonably optimized code, a 1024 x 1024 terrain tile needs around 300 ms to be initialized on my machine (an Intel Core 2 Quad Q9550 at 2.83MHz). That's way too much. Keep in mind that at 60 frames per second, each frame has a duration of 16 ms only. This means that processing a tile would make us skip at least 18 frames. Using Web Workers won't work, since we don't get access to our WebGL context inside a Worker. Besides, even if we did, it would not be a solution that scales well: it would only help on multicore machines and for a few simultaneous tiles at best. To make matters even worse, new tiles tend to arrive in batches, causing even larger delays between successive frames.
Optimizing the relevant code a bit further brought tile initialization time down to ~200ms. Not a bad effort, but still way too slow. Not many straight code optimizations left to do. Here we are, stuck in a single-threaded world, trying to avoid doing an operation that takes 180 ms too many.
2.4.3 A possible solution
Actually, there are two more things we can do.
First of all, the highly technical part: we can always use smaller tiles. Reducing tile size to 512 x 512 brings down initialization time to ~70ms! Using tiles a quarter the size of what we have been using so far has both advantages and disadvantages, but it's a clear win in this case. In the context of this application, we can even save some bandwidth due to the finer granularity of the smaller size.
All this is well and good, but 70 ms is still too slow, certainly not fast enough to eliminate stuttering. That's on a quite beefy desktop machine, too. So, what's the second thing we can do? To answer this question, we must see what exactly is that needs to be done to go from binary blobs and images to objects renderable by WebGL. Here is our raw data for each tile:- A JPEG image that contains our lightmap.
- A PNG image that holds our elevation data. These will be used to create a vertex buffer for each terrain patch.
- Another JPEG image that describes the type of terrain at each vertex. The values stored in this image will be combined with the elevation data and used as input to the terrain shaders.
- A binary blob that contains LOD-relevant data. These must be deserialized and associated with each patch object.
- Another binary blob that packs the tile's quadtree.
Let's divide and conquer. Who says we have to do all of these at once? By breaking down the process into discrete steps and keeping track of our progress in initializing each tile, we can execute one step at a time and return immediately. This way, we can greatly reduce the maximum time that we have to wait between successive display updates. Since we will be processing many tiles at once, latency (i.e. the total time between receiving a tile and actually being able to display it) will increase for each individual tile, but the maximum pause that we will have to endure between frames will be reduced to what the longest of these steps requires.
| Stage | Function |
| 1 | Decompressing lightmap |
| 2 | Decompressing elevation data |
| 3 | Decompressing terrain type factors |
| 4 | Deserialize (or generate) quadtree |
| 5 | Creating WebGL texture from lightmap image |
| 6 | Creating WebGL vertex buffers for all patches |
Decompressing simply consists of drawing the image on a Canvas (using PNG and JPEG images for transmitting elevation and terrain type data was an easy way to take advantage of the fast, native decompressors built into any browser instead of having to do this step in JavaScript) and either creating a WebGL texture object or reading the pixels with getImageData.
We will use an initialization queue. As each tile arrives, it is inserted into the queue. During each frame, one tile is removed from the front of the queue, it is processed and if not finished it is put back at the end of the queue. We can even improve on this by giving higher priority to the tiles directly ahead of the frustum.
2.4.4 What does this get us?
Here are some typical times measured for each step indepedently:
| Stage | Function | Time (ms) | |
| 512 x 512 | 1024 x 1024 | ||
| 1 | Decompressing lightmap | 19 | 34 |
| 2 | Decompressing elevation data | 21 | 57 |
| 3 | Decompressing terrain type factors | 12 | 38 |
| 4 | Generating quadtree | 1 | 3 |
| 5 | Creating WebGL texture from lightmap image | 1 | 8 |
| 6 | Creating WebGL vertex buffers for all patches | 24 | 80 |
| Total | 78 | 220 | |
The slight increase in total time is due to the overhead associated with keeping track of things. As it stands, initializing a 512 x 512 tile need not cause a pause larger than 24 ms, which can finally be deemed acceptable. As long as we are processing only one tile per frame, no stuttering should be visible.
2.4.5 Taking it a bit further
We can do better than that, though. Remember that a tile consists of many individual patches, each having its own vertex buffer and LOD-relevant data. We can further break stage 6 down into smaller sub-stages, by initializing a fraction of the tile's patches during each frame.
You can actually see this happening in the demo by watching both the Message Log and the ExternalView windows (the progress indicators change in much smaller steps during the last stage). If the engine is stressed enough, you can even see this happening in the main rendering window (i.e. the terrain will appear in a 'sweeping' movement, usually from the view position towards the horizon - more on that later). This will bring our longest time down to 57 ms and 21 ms for 10242 and 5122 tiles respectively.
The tradeoff, of course, is that we will now have to wait longer for our tiles to be ready. For this reason, it is important that initialization order is scheduled carefully. A very useful feature is the ability to 'freeze' the initialization process at any point for low-priority tiles and resume it later, if there is need. This has been instrumental in making sure that highly relevant tiles are initialized on time.
2.4.6 One last thing
There's one final optimization that we can do to help the engine. By taking into account the view position relative to the tile, we can initialize patches starting from the row or column closest to the viewer and moving towards the one that is further away. This might seem like a small thing, but it's actually not. It can make quite a difference, especially when the prefetcher is under stress. Due to the perspective effect, two patch rows close to the view point are enough to fill up half the screen, while those that lie furthest will take up a few scanlines at best.
2.4.7 The complete fetching algorithm
That's about it. The complete fetching algorithm is described below.
- Current frustum parameters are computed.
- A request is sent for each missing tile intersecting our viewing frustum.
- The prefetching area is computed and a request is sent for each missing tile intersecting it.
- Any tiles outside a second, larger circular sector that are still in the initialization state are paused. Any paused tiles inside the sector are resumed.
- Any running requests outside a third, even larger circular sector are aborted and the respective placeholder tiles are discarded.
- Any tiles in excess of the tile manager's cache capacity that lie outside a 'retaining zone' around the frustum (acting as a safeguard measure) are discarded in LRU (least recently used) order.
- Finally, the initialization queue is processed:
- The first non-paused tile is removed from the queue.
- If progressive initialization is enabled, a single initialization step is executed. Otherwise, all remaining initialization steps for this tile are executed.
- If the tile's state has not been set to 'Ready', it is inserted back at the end of the queue.
- If the queue is not empty and we can afford to initialize another tile, go back to step 1.
2.5 Using a LOD scheme
2.5.1 Why use LOD?
When rendering terrain, a level of detail (LOD) algorithm is usually employed to lighten the rendering load. This is typically done by attempting to reduce the rendered geometry's polygon count in such a way as to retain most of the original model's visual characteristics and introduce as little distortion (called 'error') as possible. In order to achieve this, an 'error metric' is defined, usually a function that quantifies the difference between the on-screen projection of the original, fully-detailed model and its simplified form.
Terrains are by their nature (pun not intended) not only extremely detailed but also, well, quite vast, thus making the use of a LOD scheme necessary. Many such schemes have been developed specifically for terrain rendering over the years, each variant suitable for the hardware of its age.
2.5.2 A crash course on Geomipmapping
Geomipmapping is a very simple and relatively efficient LOD scheme, the geometric analogue of 'mipmapping', a quite venerable technique used in 3D graphics cards for performing fast texture filtering. Geomipmapping was developed in 2000 by W.H. de Boer and while it was very much suited to the 3D accelerators of that time, it's not an especially good match for today's hardware. However, due to its simplicity, it's easy to get a basic implementation up and running and later expand on it.
A few points will provide a quick summary of Geomipmapping:
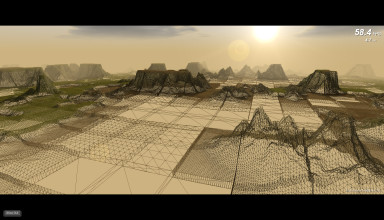
- A terrain tile is split into patches.
- A patch is the smallest unit of terrain as far as the LOD is concerned.
- It can be rendered at one of several (pre-generated) detail levels, determined on-the-fly by a suitable error metric. Depending on the viewpoint, the most simplified level that still depicts the terrain within an allowable level of accuracy is selected.
- Each successive level of detail can be built from the previous one by simply skipping every other vertex (in both dimensions) and thus reducing polygon count. In other words, for any level, the vertex stride is equal to 2level (i.e. level 1 will include every other vertex of the original model, level 2 one every four, level 3 one every eight, etc.).
- Even though modern JavaScript engines are very, very fast, modern graphics cards are even faster. This must be taken into account when choosing the type of error metric calculation to be used.
- The point of maximum elevation difference between the original and the simplified model can be found offline for each LOD index. Projecting this vector (i.e. the difference between the true and the simplified terrain) on the screen in real time and calculating its length will produce an error that can be measured in pixels. This however can be a costly operation.
You can try disabling the LOD and see if it makes a difference in your machine.
2.5.3 Some numbers
- Each patch must have a number of vertices per side that is of the form 2n + 1 (or in other words 2n cells).
- The number of detail levels provided is equal to log2(x - 1) + 1, where x is the number of patch vertices per side. In this implementation for example, a patch size of 33 x 33 vertices provides 6 detail levels.
- Level 0 is the level of full detail (i.e. all of the original terrain vertices are included in this level). It has 2(n - 1) + 1 vertices per side, where n is the number of detail levels provided by the configuration.
2.5.4 The main problem with skipping vertices
Skipping vertices introduces visible cracks between adjacent patches with different LOD indices. This has been traditionally fixed by employing one of two methods, called 'skirting' and 'stitching'.
You can disable crack fixing in the demo to see the cracks.
Stitching means replacing the outer zone of each patch with stripes triangulated in a way appropriate to the number of vertices on each of the stripe's sides. Each stripe essentially acts as a bridge between the two different levels of detail. This is not only cumbersome to implement correctly, but also much slower in practice, since it requires some real-time bookkeeping as well as an increased number of rendering calls. However, it has a 'correct approach' feeling to it, especially when compared to the hack that is skirting.
Skirting on the other hand is much simpler. Vertical, outward-facing 'wedges' are drawn from each pair of outside vertices, appropriately textured. This has the effect of 'hiding' the cracks. It's very easy to implement and it has the very significant advantage of not being dependent on each adjacent patch's LOD index. This both simplifies the code and makes it extremely fast.
However, skirting requires choosing a suitable length for the wedges. Care must be exercised here, since if this length is too short, some cracks may still be appear, especially in the horizon. If on the other hand it is too long, precious fill rate is being wasted.
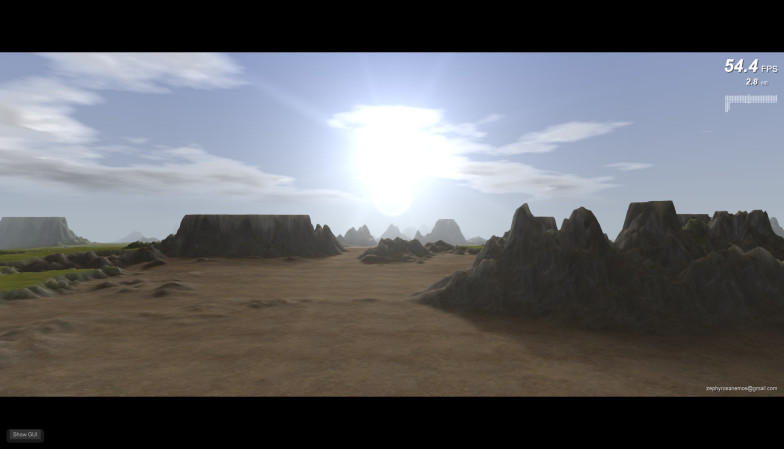
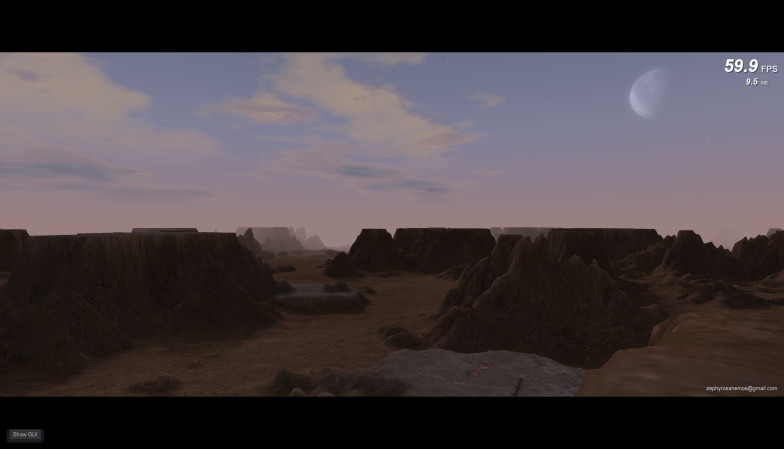
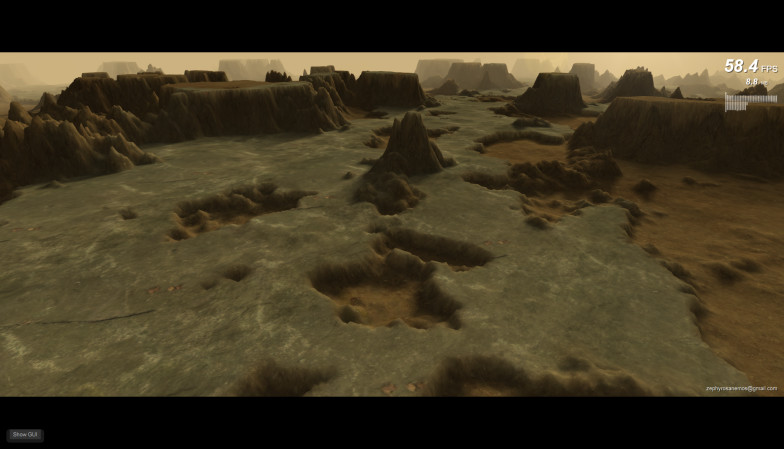
While skirting sounds like it would introduce obvious artifacts, it does not. See if you can find the sole such artifact in the starting screen.
In this engine, both skirting and stitching have been implemented for crack fixing. While stitching is the 'orthodox' and more difficult to implement solution, skirting does everything better (also see below).
You can select between skirting and stitching to see the difference. Notice the drop in FPS when stitching is selected. Turn either wireframe rendering or LOD visualization on to see how they work.
2.5.5 Other problems with skipping vertices
Lighting is usually done by applying part of the tile's precomputed lightmap over a patch instead of using stored intensity values at each vertex. This is done because as the LOD index changes and vertices are either omitted or reintroduced, the linear interpolation betwen vertex attributes would cause very noticeable shifts in lighting levels. In constrast, the lightmap remains unaffected, since lighting has already been essentially 'baked' onto it.
However, even when using a lightmap, small artifacts can be sometimes seen when the level of detail changes. This is called 'popping' and it is the effect of geometrical distortion. Popping can be virtually eliminated by smoothly interpolating elevation (Y coordinate) values between different LOD indices. This feature can be easily combined with skirting but it's much harder to pull off (if not downright impractical) when using stitching.
2.5.6 So, how well does it work?
The answer is quite surprising: on a Core 2 Quad equipped with an NVidia GTX 280, it doesn't really make a difference in rendering speed and it took quite a lot of work to reach that point. In early implementations, turning the LOD on would drop the frame rate almost by half! That's because on modern machines rendering a few million triangles is faster than taking a few milliseconds to select a suitable level of detail and render that. That was quite disheartening at first, to say the least. After a lot of optimizations and being cleverer than Mr. Clever, the cleverest fox in Cleverland, enabling the LOD leaves the frame rate untouched.
2.6 Using a quadtree to accelerate picking
The quadtree can be either generated on-the-fly or downloaded. Generation can be really fast when properly optimized, but even then it adds a significant amount of delay when initializing a newly downloaded tile. Generating the tree offline and deserializing it from a binary blob is a bit faster. Since for 512 x 512 tiles, the blob's size is only 48 KB, sending the data may be preferable.
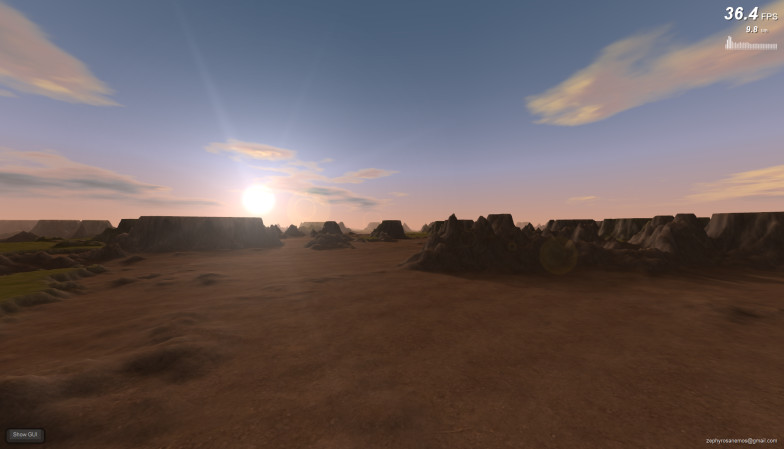
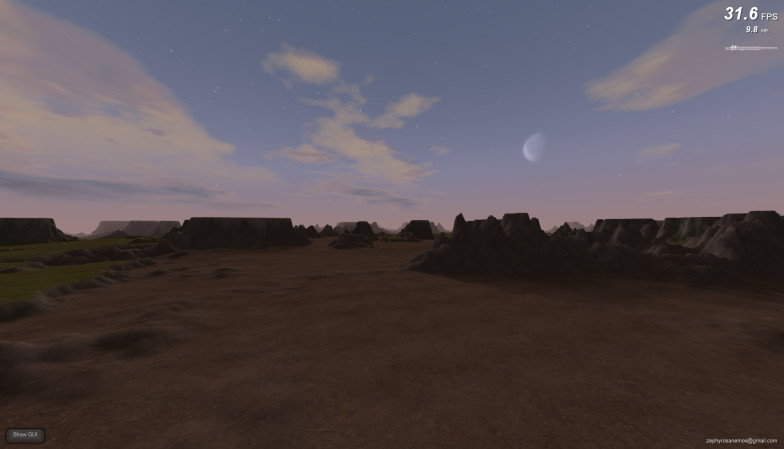
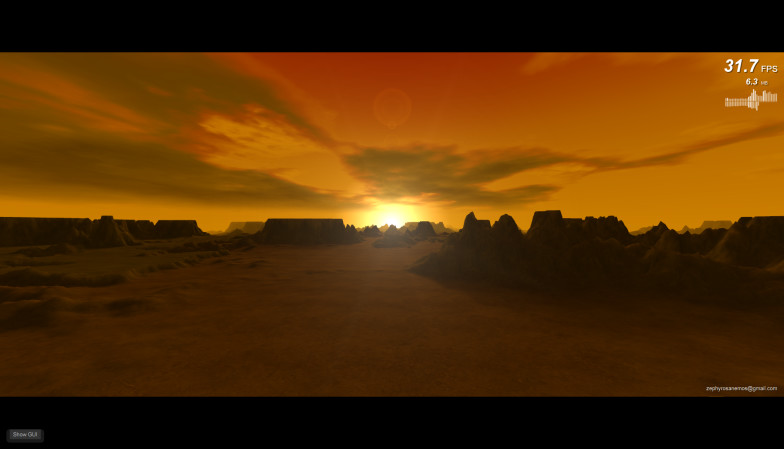
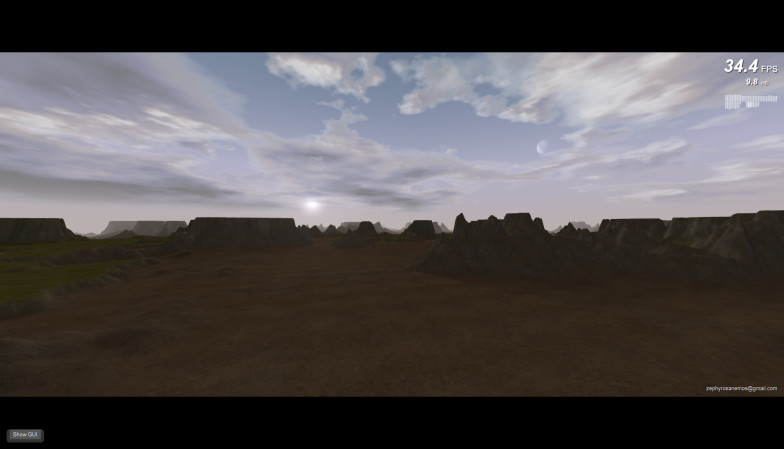
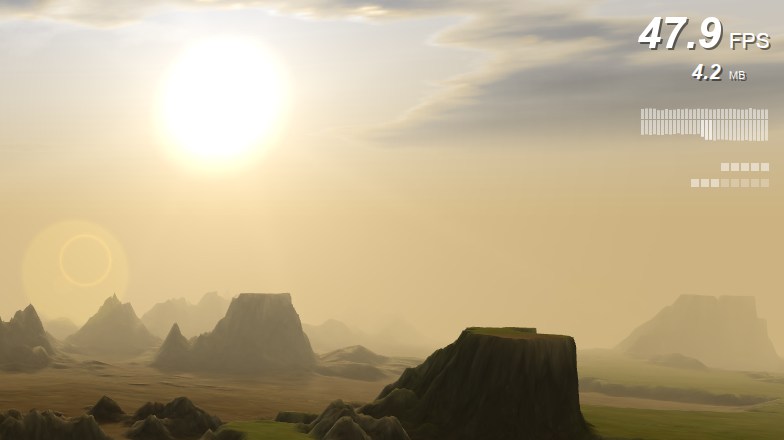
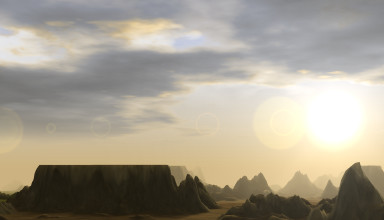
2.7 The sky
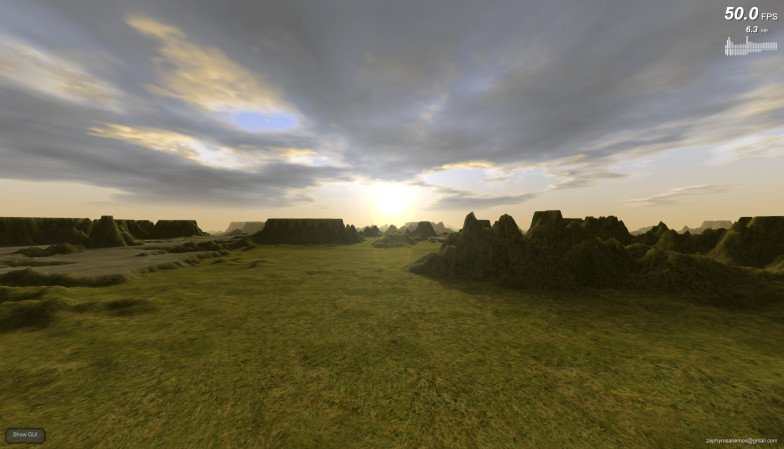
The quality of a sky renderer can make or break a terrain engine. This is a semi-procedural implementation that with a bit of trial and error can produce quite convincing results.
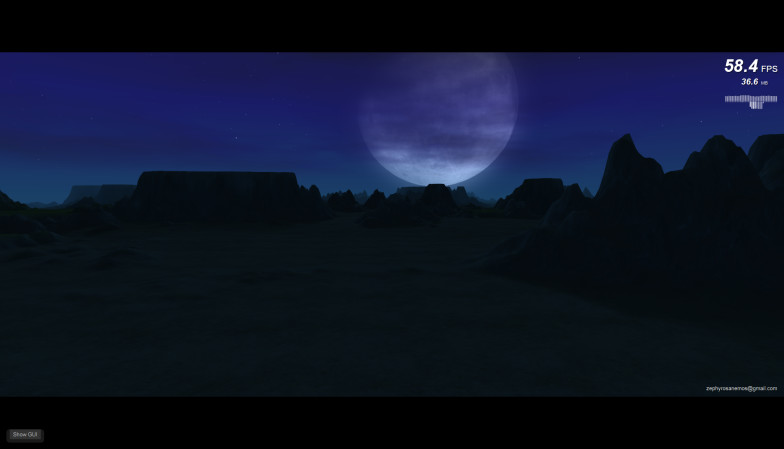
It uses a dome for rendering the colors of the atmosphere at various heights, two bent planes as cloud layers, a few layers of quads for celestial objects and a larger dome for rendering stars. All of this can be seen in the External View window.
It is very loosely coupled to the terrain renderer, in order to provide lighting parameters. All colors are prespecified in the form of continuous palettes (that's the static part), but cloud generation and shading are done in real-time.
Very briefly:
- Multiple cloud layers, generated and shaded in real-time. All calculations can be efficiently done by a Web Worker, if so desired.
- Cloud cover and sun visibility through clouds both affect world lighting.
- Multiple celestial bodies, each having its own impostor, glow and flare layers.
- Impostor generation done in real-time, allowing for changing the phase of non-self-luminous celestial bodies.
- Stars layer implemented using viewpoint-aligned quads.

3. Some closing thoughts
This implementation served its purpose well (that is me learning JavaScript!). It's by no means commercial-quality, but -like the GUI- it is fairly solid at what it does. As for the three goals, it takes a decent shot at all of them. With further work, it could possibly form the basis of a real game, although some design decisions could possibly change (for example I wouldn't go for Geomipmapping this time; probably not even a heightfield, since being able to have overhangs and caves would be quite nice; basic principles would remain the same though). At this point, it serves as an educational plaything, illustrating key concepts such as frustum culling and frustum handling in general, Geomipmapping advantages and drawbacks, a potential way to implement background tile downloading and initialization, a procedural sky subsystem, etc.
The terrain engine weighs in at ~7KLOC in 20 files. About half of this code is dedicated to generating and rendering the sky.
About me
I am a programmer currently living in Greece. I started learning JavaScript a bit more than year ago, with the purpose of getting into web development and (eventually) building a portfolio site. Although I've been programming for many years, I don't have much experience developing for the web at all. Hopefully this will change.
My interests include low-level assembly coding, graphics programming in all its forms, language and compiler design, UI development, artificial intelligence, CPU/GPU architecture, anything challenging and interesting really (that's a tautology!).
During the last decade, I've helped build Anadelta Tessera, a desktop road design CAD written in Delphi.I'd love to chat about these or any other topics, projects I've worked on, remote work opportunities or anything else that's on your mind. Drop me a line at zephyrosanemos@gmail.com